Thursday, January 10, 2013

Acrylic Painting, Clay Tile, and What Happens Next

 The acrylic painting took a lot of time and work. We started off by finding references of landscape pictures online. We were required to have a foreground, middle ground, and background. After this project, I decided to stick with the bear theme...
 With the clay tile we also had to find references. We then sculpted the clay and painted it. And the bear theme continues...
Photoshop is probably my new favorite thing. You're supposed to geuss what happens next in the picture..................................................... I think it's pretty self explanatory.

Tuesday, December 11, 2012

Game Drawing

To be honest..... I did not like this project. At all. I have mixed feelings about the final outcome. I think the project was a good idea to learn about perspective and vanishing points, but I would have rather drawn the hall way 5 more times. Not quite sure what it was about this project that I didn't like; maybe it was the water paint.... nahh it wasn't that. There was just so much detail in the reference picture, it was very time consuming when trying to get it all included in the paiting/drawing. On the bright side, I think I have a much better understanding of the importance of vanishing points and using a horizon to my advantage.

Monday, November 19, 2012

3D Anamorphosis


1. The first step in this project was to chose and object and bring it into photoshop. We then used anamorphosis to transform the object (in my case a shoe) and make it apper longer and distorted.
2. Distorting and stretching the shoe allowed the image to appear normal based on what perspective it was viewed in.
3. The most important concepts were to accurately create a grid and transfer the image into our sketchbooks with colored pencils. We had to make sure the scales were equal so that the image we drew would appear 3D. Another important concept was to use different values when coloring the object. We had to make sure there reflections (light spots) and shadows ( dark spots) so that the image would look 3D.

Stencils


1. One day, Mr. Sands took us on a magical journey to the computer lab where we chose a picture of something we wanted to make a stencil of. After choosing the picture, we went into photoshop and changed the threshold so that the picture would be black and white. Next, we printed the altered picture, projected it onto poster board, and traced the shape. Lastly, we used an xacto knife to cut out the black shapes (forming positive and negative space) , thus creating a stencil.
2. To make the frame, we cut and nailed together four pieces of wood and then used a staple gun to attach a piece of carboard for the base of the background. In order to make the carboard pretty, we ripped out pictures from art books and arranged them in a collage type fashion. My background was composed of mainly black and white photos arranged nonformally for my background.
3. Positive space is the shapes that show up after spray painting, and negative space is the area where there is no spray paint. The positive and negative space created a really nice contrast.
4. When using the xacto knife, Mr. Sands had one rule- NO CUTTING YOURSELF. We had to be careful not to get our hands in the way when cutting and we had to put a cutting board underneath so that we would not scratch up the table. After a while I started to get  callouses on my hands!
5. My first try with the spray paint I really wanted to use hot pink, but there was not enough contrast, so I had to remove the stencils, lightly spraypaint the background white, and then use black for my stencil instead. I had to trim the edges of the stencil multiple times before it would fit inside the frame.

Monday, October 22, 2012

Final Print


1. In this project, I achieved balance by creating an even amount of positive and negative space. Movement can be seen in the mane because of the texture.
2. I added texture to my print by cutting small lines for the mane and other body hair. This took a lot of concentration because I didn't want the indents to be too big, but they needed to be large enough to the point where they would show up. I added contrast by using a dark color paint and a light colored sheet of paper. Texture and contrast were important in this project because with out them, it would be nearly impossible to see the image.
3. I used positive space to show the silohuette of the lion and the sky in the background. The negative space included the grass and the mountains in the background as well as the eyes, nose, mouth, ears, and mane.
4. Overall, the craftsmanship of of my print is pretty good. There are a few spots that weren't cut deep enough, so they got filled with paint and didn't show up in the print. Other than that, it is very easy to tell that my print is a picture of a lion.
5. I was able to achieve depth by putting the lion in the foreground, the grass in the middle ground, and the sky and mountains in the background.
6. Overall, I enjoyed this project. We got to use new tools and got the chance to paint the tabels!!! (but then had to clean it up later) The main obstacle I encountered was making sure the print distributed the paint evenly. For some reason there were a few spots on the print that the paint would not stick to. Other than that, I really enjoyed this project.

Thursday, October 4, 2012

Print Making


1. Texture is important to have in our sketches because it makes the image so much more interesting. For example, the mane and whisker spots of my lion sketch make it look much more realistic than if I just didn't include them. Also, the texture of the grass in the background really brings the scene to life.
2. It is necessary to have multiple references of each animal and each background so that we can combine different characterisitics of each to make the print specific to us. In my drawing, I combined the view of a standing, white lion with the characteristics of a normal brown lion. Then, I combined a mountaneous background with a saharan background. 
3. When I looked at my sketches, it was very easy to see which one would come out as the best print. I chose the lion because it had the most texture and detail to it. I also chose it because it is fierce, just like me! 

Chalk Murals

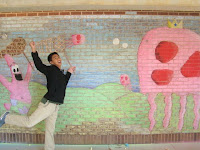
1. For some odd reason, I was a team captain. GO FIGURE! We each had 4 or 5 people on our teams and were directed to come up with 10 different ideas. We then had to choose our favorite one and draw it out on paper.


 2. Next, we chose a spot in the courtyard to draw our murals. We had to assign jobs in order to manage our time correctly. So while the boys colored in the Queen Jellyfish, Rachel and I woked on the smaller jellyfish and Patrick Star.


3. Unfortunatley, later that day it completely downpoured, so all of our work was washed away. The next day we had to start from scratch, and that really set us back. Because of this unfortunate event, we were not able to include all of the fine details we wanted to.


4. Creating art work that the whole school could work with was a blast. Every time someone walked by, we got a complement. Obviously, jellyfishing is just something that everyone has always wanted to do!!